Tech Note 2 Stringing the FM dial cord on the ICF-6800W
(last rev September 2009)
1. PREAMBLE
OK, the PLL is humming like well oiled machine by now... Time to put
the radio back together. Of course, during disassembly the FM dial cord
arrangement fell apart. No problem one thinks... all the stringing is
well documented in the service manual SM. Oops... not this one...the
documented stringing on page SM 35 uses 1 cord...but production radios
use 2 (at least the serial numbers I have seen). Get ready for a
serious puzzle if you need to reverse engineer this one...this page has
some hints.
2. STRINGING THE DIAL CORDS - EASY WAY
Available are 2 cords: one (A) has a longer, thinner spring and is
longer in length and another cord has a fat spring and is about 5cm to
10cm shorter (B). You can string them independently. Direction
left/right from top as you have the front of the unit facing towards
you.
a. Cord B
i. This is used to connect the dial drum with the capacitor drum.
ii. Both spring and eyelet attach to the capacitor drum, to the two
hooks on this drum. The guidewheels at the sides are not used.
iii. Turn the tuning cap fully counterclockwise and position the cap
drum with its opening to the left as seen from the top. Position the
dial drum opening down. Attach the eyelet to the top hook of the cap
drum. Immediately go right, straight down to the other drum. Go round
90, attach to the hook on the dial drum, go around, then straight up at
the other side. Go around over the top of the cap drum. Attach the
spring to the free hook on the cap drum.
iv. You should end up with both drums smoothly running in tandem.
b. Cord A
i. This is used to connect the dial drum-capacitor drum unit as above with the dialing shaft.
ii. Both spring and eyelet
attach to the dial drum, to the two hooks on this drum. The
guidewheels at the sides are used, hence the longer length.
iii. Start with the dial drum opening down. Attach eyelet to hook. Go
to the left, and around to the tuning shaft (attack from right). Make 3
turns, then go to left guiding wheel. Go up to cap drum. Run cord over
cap drum to other right guiding wheel. Immediately run to the opening
of the dial drum and attach spring to remaining hook.
iv. Everything should run very smooth over the whole range, if cords
tnagle/block try again.... Cord A is easiest if you do everything
without the left guiding wheel, and then add tension by running cord
over this wheel.
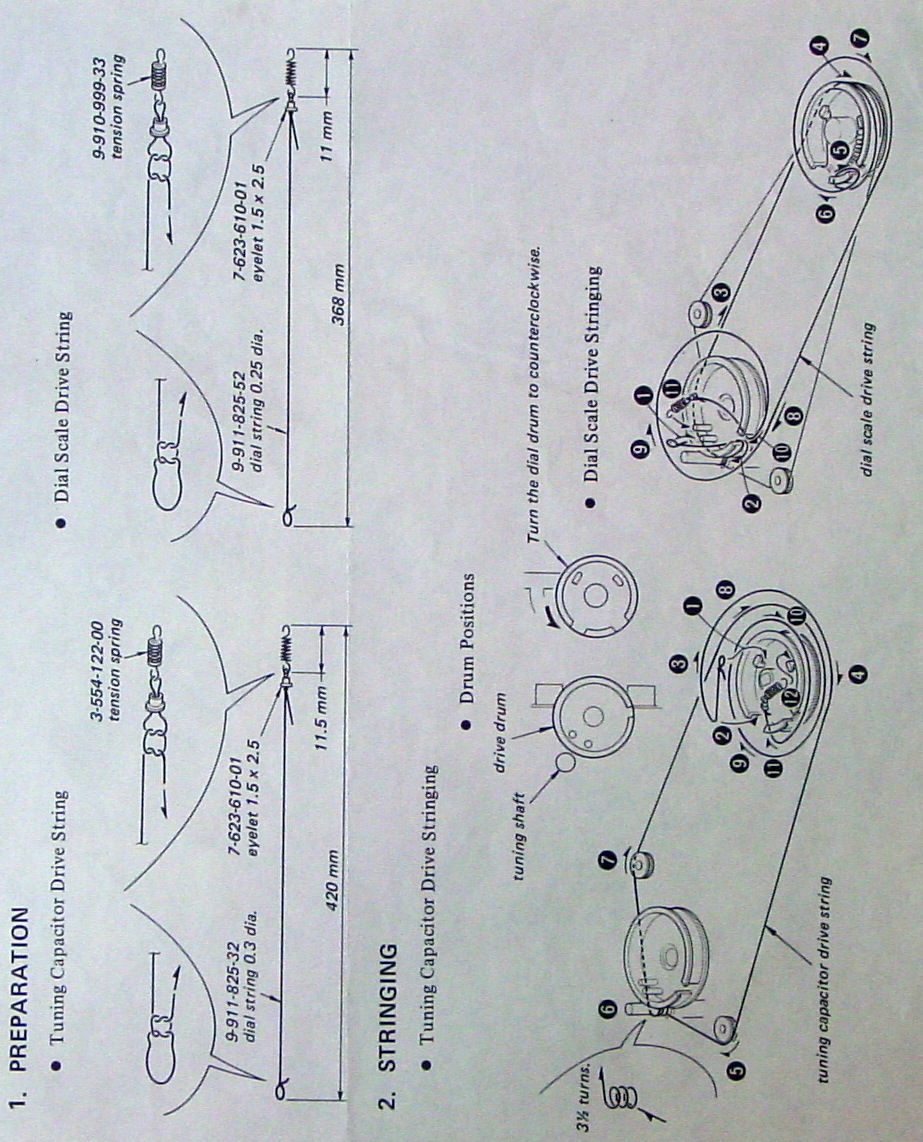
3. STRINGING THE DIAL CORDS - FACTORY WAY
Available are 2 cords: one (A) has a longer, thinner spring and is
longer in length and another cord has a fat spring and is about 5cm to
10cm shorter (B). You can string them independently. Direction
left/right from top as you have the front of the unit facing towards
you.
This one has cord B (cord 1 in figure) ends on dial drum, and cord B
ends on cap drum. A service manual suplement exists with details (thans
Carel Kuijer)

4. ALIGNMENT
The dial scale itself is to be positioned to a known frequency. You can move it around by hand.
5. DOCUMENTATION
One can find decent scans of the service manual on the web (Mauritron
original). For this problem, they don't help - they are even confusing.
back
